Views: 0 Author: Site Editor Publish Time: 2025-11-11 Origin: Site


I remember the first time I tried outdoor lights solar led Installation. The process felt simple, and the results amazed me. When I switched from regular lights, my energy bills dropped. Traditional outdoor lights burn about 60 watts every hour, but solar lights cut that cost out completely. I also noticed the difference in my carbon footprint. Solar lights run on renewable energy, so they do not emit harmful gases. I love knowing that my yard stays bright while I help the planet.
Solar lights help you save money and use less energy. They use renewable energy, which is better for the planet. Pick a spot that gets lots of sun for your solar lights. This helps them work their best. Clean the panels often and check the batteries. This keeps your solar lights working well. Use good parts and tools when you set up the lights. This helps you avoid mistakes and makes the lights last longer. You can add motion sensors to your lights. This makes your outdoor lighting safer and more efficient.
When I did my first outdoor lights solar led installation, I made sure to get all the main parts first. Here is what I always check for in a solar outdoor lights kit:
Solar panel: This part takes sunlight and changes it into electricity. I look for high efficiency so my lights charge well, even if it is cloudy.
Rechargeable battery: The battery keeps energy from the solar panel. I like to choose one with a big capacity so my lights stay on longer at night.
LED bulbs: These bulbs use little power but are very bright. They last a long time and do not get hot.
Controller circuit: This small device controls how electricity moves between the solar panel, battery, and lights.
Fixture housing: The housing protects everything from rain, dust, and bugs.
Pole or stake: This holds up the fixture and lets me put the light where I want.
I keep my toolbox simple for solar projects. Here are the tools I use most:
Screwdriver (Phillips and flathead)
Adjustable wrench
Tape measure
Small shovel or trowel (for ground lights)
Wire cutters and strippers
Level (to make sure the solar panel is straight)
Pencil or marker for marking spots
Sometimes, I want extra features or a nicer look. Here are some add-ons I find useful:
Motion sensors for security
Remote controls for easy changes
Extension cables for putting the solar panel farther from the light
Decorative covers or shades
Tip: I always check the build quality before I buy. I look for strong materials like aluminum or stainless steel. UV-resistant coatings help plastic parts last longer. I also check for a good warranty. At least 10 years means the company trusts their product.
When I start any outdoor lights solar led installation, I always look for the sunniest spot in my yard. Direct sunlight is the secret to getting the best performance from solar lights. I check for these things before I pick a location:
Orientation matters. I make sure the solar panels face south if possible. This direction gets the most sunlight during the day.
Tilt angle helps too. I adjust the angle of the panel based on where I live. A slight tilt lets the panel catch more rays.
I watch out for shading. Trees, fences, or buildings can block sunlight and make the lights dimmer.
Local weather plays a role. If my area gets lots of clouds, I try to find a spot that stays clear most of the day.
Tip: Solar lights need about 6-8 hours of direct sunlight to charge fully. If they get less, they might not shine as bright or last as long at night.
I grab my tape measure and walk around the yard. I decide where I want each light to go. I measure the distance between lights so they look even and cover the space well. I use a pencil or marker to make small marks on the ground. This step helps me avoid mistakes later.
I check for obstacles like rocks or roots.
I make sure the marked spots get enough sunlight.
I plan the layout so the lights guide people along paths or highlight garden features.
Good soil prep makes installation easier. Here’s what I do:
If the soil feels hard, I water it to soften it up.
I use a shovel or garden fork to loosen the ground where each light will go.
I never force the stakes into tough soil. If they resist, I water again and break up the dirt more.
Note: Pre-softening the soil helps prevent damage to the stakes and keeps the lights steady.
I find that taking time with these steps makes the whole process smoother. My solar lights stay secure and work better when I prepare the site well.
I always start my outdoor lights solar led installation by laying out all the parts. I check the instructions from the manufacturer. Each light usually comes with a fixture, a pole or stake, and sometimes a bracket. I connect the fixture to the pole by lining up the holes and tightening the screws. If the pole has sections, I snap or screw them together until they feel sturdy.
Here’s how I make sure the assembly goes smoothly:
I double-check that every piece fits snugly. Loose parts can make the lights wobble or fall over.
I keep all screws and small parts in a bowl so I don’t lose them in the grass.
I avoid forcing pieces together. If something doesn’t fit, I look at the instructions again.
Tip: Don’t rush this step. If the pole isn’t straight or the fixture feels loose, the light might not work well or could tip over in the wind.
Some common mistakes I’ve seen during assembly:
Loose or incorrectly connected cables can lower efficiency and even cause safety problems.
Ignoring the environment, like not checking for wind or rain, can lead to lights that don’t last.
Picking the wrong type of light for the area can make some spots too bright and others too dark.
Next, I move on to the solar panels. For most solar light installation kits, the panel is either built into the fixture or attaches to the top. If it’s separate, I use the included bracket to mount it on the pole or a nearby wall.
Here’s my step-by-step process:
I pick a spot that gets full sun for at least 6-8 hours each day. I avoid shade from trees, fences, or buildings.
I angle the panel slightly toward the south. This helps the solar panel catch the most sunlight.
I use a level to make sure the panel sits straight. A crooked panel won’t charge as well.
I tighten all screws and brackets so the panel stays put, even in bad weather.
Note: If the panel is dirty, I wipe it clean before installing. Dirt can block sunlight and make the lights dim.
I always remember that proper planning is key. I look at my yard and think about where the lights will look best and work best. I want my solar lights to shine bright all night.
Now comes the part where I connect the batteries and wiring. Most outdoor lights solar led installation kits have a battery compartment inside the fixture. I open it up and insert the rechargeable battery, making sure the positive and negative ends match the markings.
For the wiring, I follow these steps:
I connect the wires from the solar panel to the controller and then to the battery.
I check that all connections are tight. Loose wires can cause the lights to flicker or not work at all.
I tuck the wires inside the housing to keep them safe from rain and bugs.
Safety Tip: I always disconnect the power before working with wires or batteries. I wear gloves to protect my hands and keep a fire extinguisher nearby, just in case.
Some safety steps I never skip:
I never connect wires while the system is live.
I work with a friend if the installation is big.
I use gloves and make sure my tools have insulated handles.
Mistakes to avoid here:
Poor wiring connections can cause short circuits or make the lights stop working.
Using the wrong battery size or putting it in the wrong spot can shorten the life of the solar lights.
The last step in my solar light installation is placing the lights in the ground or on a wall. I use the marks I made earlier to guide me. I push the stake or pole into the soil, making sure it stands straight. If the ground is hard, I wiggle the pole gently or water the soil to soften it.
Here’s what I do to get the best results:
I space the lights about 6 to 8 feet apart for even coverage. For walkways or bigger spaces, I sometimes put them 4 to 6 feet apart.
I keep the lights away from other light sources. If a streetlight or porch light is too close, my solar lights might not turn on at night.
I check that each light gets direct sunlight during the day.
Tip: I always step back and look at the layout before finishing. I want the lights to guide people safely and make my yard look great.
Common pitfalls I watch out for:
Setting the pole at an angle can make the light shine in the wrong direction.
Forgetting to check for sunlight can leave some lights dim or off.
Not planning for maintenance can make it hard to clean the panels or change the batteries later.
I find that taking my time with each step makes the whole installation process easier. My outdoor lights solar led installation always works better when I pay attention to the details. When I finish, I feel proud seeing my solar lights turn on at dusk, lighting up my yard with clean, free energy.
After I finish the installation, I always test my solar lights to make sure everything works. I follow these steps every time:
I check the solar panel. It must be clean and free of leaves or dust.
I look at the battery. I make sure it holds a charge and the connections feel secure.
I inspect the lighting fixture. I look for cracks or anything blocking the light.
I examine the pole. It should stand straight and show no signs of damage.
I review the wiring. I look for corrosion and make sure all connections are tight.
I use a light meter to measure how bright the light is. This helps me know if the output matches what I expect.
If something looks off, I fix it right away. I want my solar energy system to shine bright from the start.
Getting the most out of solar energy means adjusting the solar panel angle. I learned that changing the tilt a few times a year can boost efficiency. Here’s a table that shows how different adjustment methods affect energy capture:
Adjustment Frequency | % of Optimum Energy Capture |
|---|---|
Fixed | 71.1% |
Adjusted 2 Seasons | 75.2% |
Adjusted 4 Seasons | 75.7% |
2-Axis Tracker | 100% |
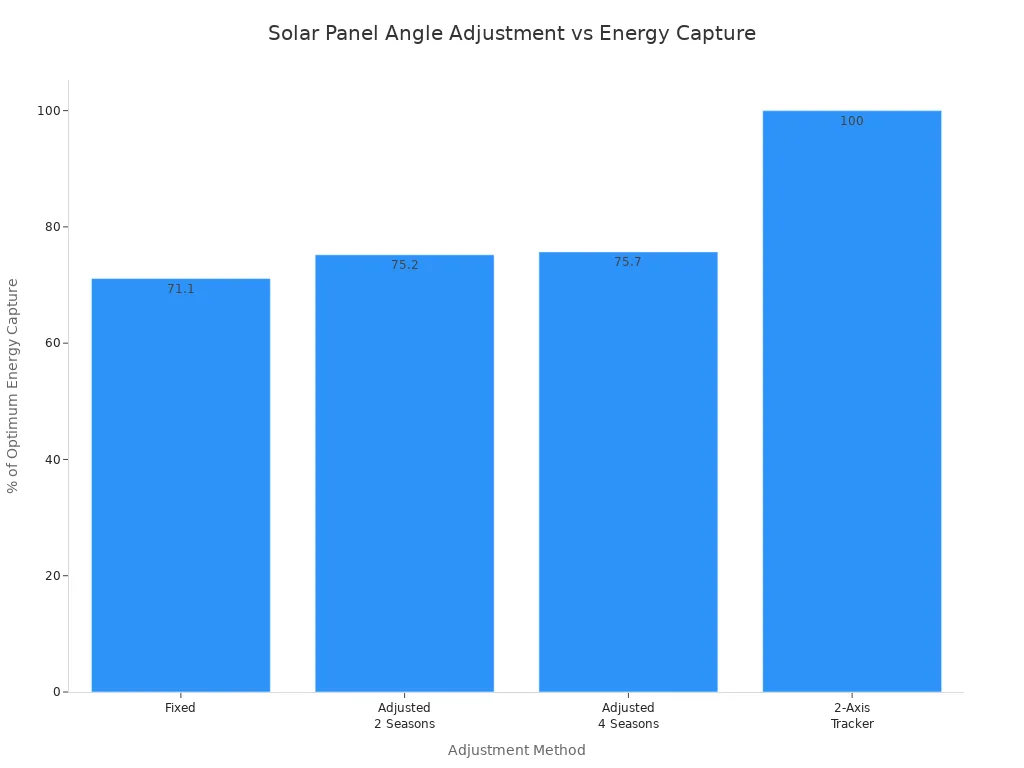
I tilt my panels based on the season. In winter, I add 15 degrees to my latitude. In summer, I subtract 15 degrees. I only need to adjust the angle four or five times a year. This simple step helps my solar energy system work better.
Sometimes, solar lights do not turn on after installation. I use this checklist to solve problems:
I check if the solar panel gets enough sunlight. I clean it and move it if needed.
I inspect all wiring and connections. I fix any damage I find.
I test the light sensor by covering it. If it does not work, I clean or relocate it.
I use a multimeter to check the LEDs. I replace any that are burnt out.
I look at the batteries. If they are old or corroded, I swap them out.
I check for water damage. I reseal cracks and make sure water drains away.
I always take my time with troubleshooting. A careful check keeps my solar energy system running smoothly.
I always keep my solar lights in top shape with regular cleaning and quick checks. Every month, I grab a soft cloth and some soapy water. I wipe the solar panels and covers to remove dirt and dust. This helps the panels soak up sunlight and keeps my solar lighting bright. I also look at the light fixtures and lenses. If I see any bugs or leaves, I clear them away. I check the area around each light to make sure nothing blocks the sun. Sometimes, I spot loose screws or worn parts. I tighten or replace them right away. This simple routine keeps my eco-friendly lights working well.
Clean solar panels and covers with soapy water and a nonabrasive cloth.
Inspect batteries for corrosion and replace if needed.
Check wires for damage from animals.
Clean the light fixture and lens to remove dirt.
Monitor the charge controller for any problems.
Make sure the area around the lights stays clear.
Batteries are the heart of solar lights. I check them every few months for corrosion or leaks. If I see white powder or rust, I swap out the battery. Most solar lighting systems use NiMH, NiCd, or lithium-ion batteries. Here’s a quick guide I follow for when to replace them:
Battery Type | Replacement Interval |
|---|---|
NiMH/NiCd | Every 1 to 2 years |
Ni-Cd | Every 6 months to 1 year |
Lithium-ion | Every 3 to 5 years |
LiFePO₄ | Every 5 to 10 years |
I always use the right battery type for my lights. This keeps my eco-friendly solar lighting running longer and brighter.
Sometimes, my solar lights act up. Maybe they flicker or don’t turn on. I use this table to help me fix common problems:
Performance Issue | Causes | Solutions |
|---|---|---|
Inconsistent or Flickering Light | Loose connections, battery issues | Check connections, replace battery |
Motion Sensor Malfunction | Sensor misalignment, obstructions | Adjust sensor, clear obstructions |
Dusk-to-Dawn Not Working | Faulty sensor, low battery charge | Replace sensor, charge battery |
Water Damage | Rainwater, bad seals | Check seals, add weatherproofing |
I always check the connections and clean the sensors. If a light still won’t work, I look at the battery or the wiring. Fixing these issues keeps my eco-friendly solar lights shining.
When seasons change, I give my solar lighting extra care. Before winter, I replace old batteries and tilt the panels to catch more sunlight. In snowy months, I brush off snow and ice from the panels. I also store some lights indoors if the weather gets too harsh. Regular cleaning and checks help my eco-friendly solar lights last longer. I find that solar pathway lights last about 2-4 years, while solar spotlights and wall lights can go 3-5 years. Solar floodlights can even last up to 7 years with good care.
Tip: Monthly cleaning and quick inspections keep your solar lighting system working its best, no matter the season.
I always feel safer when I add motion sensor solar LED flood lights around my outdoor spaces. These lights turn on when they sense movement, which helps scare off anyone who shouldn’t be there. I like how these security lights make my yard bright only when needed. This saves energy and keeps my home safe. Here’s why I trust them for outdoor security:
They light up dark areas when someone walks by, which can stop intruders.
A bright yard makes my home less of a target for crime.
I can see better at night, so I don’t trip or bump into things.
These lights use solar power, so I don’t worry about higher bills.
They work even on cloudy days because of advanced solar cells.
The motion sensors alert me if something moves outside.
I find that installing these security lights is simple. I just pick a spot that covers the area I want to protect, mount the light, and make sure the solar panel gets sun during the day.
When I plan an off-grid outdoor lighting system, I start by thinking about where I need light the most. I walk around my yard and decide which paths, driveways, or corners need extra security. Here’s my step-by-step plan:
I sketch a map of my outdoor space and mark where I want each light.
I count how many lights I need and check their power ratings.
I choose solar-powered lights for easy setup and less maintenance.
For bigger areas, I connect several LED lights to a solar panel and battery bank.
I add timers or sensors to make sure the lights only turn on when needed.
I use weatherproof cables and connectors to keep everything safe from rain.
Tip: A good layout means every part of my outdoor area feels safe and bright at night.
I always want my off-grid outdoor lights to work all night, even after cloudy days. To do this, I figure out how much power my lights use. I list each light, check its wattage, and guess how many hours it will run. Then I add up the total. I divide this number by the average hours of sunlight my yard gets. This tells me how big my solar panel should be. I also pick a battery that can store enough energy for a few days.
I use a charge controller to protect my system. The controller helps the battery charge safely and keeps the lights running longer. Some controllers adjust the power flow, so my outdoor lights work well even when the weather isn’t perfect.
Step | What I Do |
|---|---|
List lights | Write down each outdoor light and its wattage |
Estimate hours | Guess how long each light will run at night |
Add up total watts | Multiply and sum for total daily use |
Check sunlight | Find out how many hours of sun I get |
Size solar panel | Divide total watts by sun hours |
Pick battery | Choose one that stores enough for a few nights |
Add controller | Use it to keep the battery healthy |
With these steps, I know my outdoor security lights will stay on when I need them most.
I hope this guide helps you feel sure about installing solar lights. When I put in a light, I always check the panel, the wires, and the battery. I clean each light and test how bright it is. Solar lights help save money, cut down on pollution, and keep my yard safe. Here are some things I always keep in mind:
Solar lights help the planet and save you money.
Each light works even if the power goes out.
LED lights last a long time and use less power.
I avoid problems by looking at this table:
Pitfall | Consequence |
|---|---|
Wrong panel angle | Lights will not be as bright |
Weak mounting | Lights might fall down |
Bad wiring | Lights may not work |
Skipping maintenance | Lights can stop working |
Ignoring weather | Lights may not last as long |
If you want better lights, pick ones with sensors or that can handle bad weather. If the job is hard, I ask an electrician for help. Solar lights make my home safer, brighter, and better for the earth. If you have trouble, you can always look back at this guide for help!
Most of my solar lights stay on for 8 to 10 hours after a full day of sun. If the battery is new and the panel gets good sunlight, I see them shine all night.
I try to avoid shady spots. Solar panels need direct sunlight to charge well. If I must use a shady area, I pick lights with separate panels and place the panel in a sunny spot.
First, I clean the solar panel and check the battery. Sometimes, dirt or old batteries cause problems. I also look at the wiring and make sure nothing is loose or broken.
No, I don’t. My solar lights have sensors that turn them on at dusk and off at dawn. I just leave the switch in the “on” position, and they handle the rest.
Note: I never use regular batteries. Only rechargeable batteries work in solar lights. Regular batteries can leak or damage the system.


 English
